2022.06.04 - React / Lifecycle Hooks (~ v16.3 전과 후 )
- Lifecycle?
리액트 컴포넌트는 탄생부터 죽음까지 여러지점에서 개발자가 작업이 가능하도록 메서드를 오버라이딩 할 수 있게 해준다.
리액트 컴포넌트의 라이프사이클은 (Declarative)디클레러티브라는 성질을 갖고있는데, 여러가지 탄생부터 죽음까지 순간순간을 선언적으로 표현해놓으면 해당 상황이 되었을때 선언적으로 표현된 함수를 실행해서 사용할 수 있게 해준다.
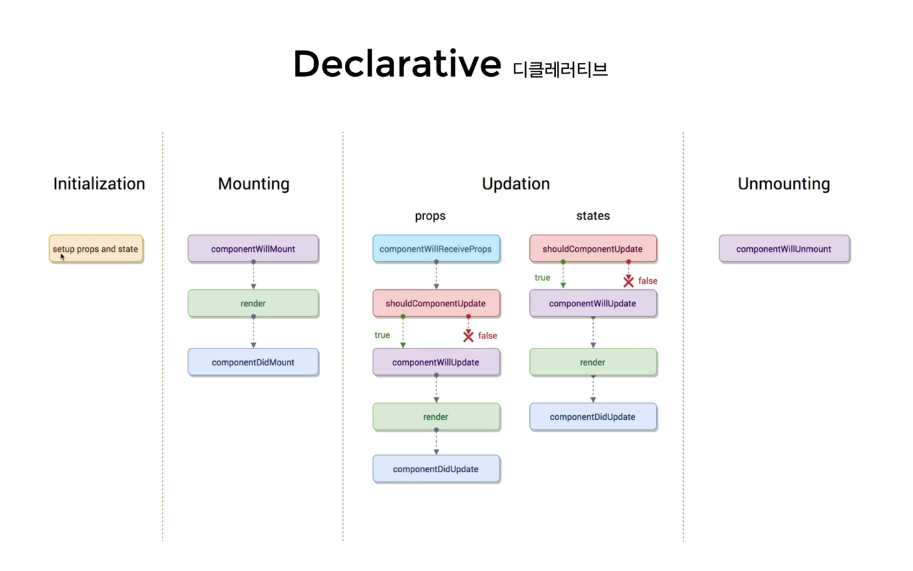
lnitialization ( state의 초기값이 설정되는 구간 )
-> Mounting( 최초 랜더 / 그리는 구간 )
ComponentWillMount(랜더 직전), render(브라우저에 최초로 그려지는 것). ComponentDidMount(랜더 직후)
-> Updation (props, states가 바뀐것을 의미-> 변경되면 랜더 메소드가 다시 실행됨)
*shouldComponentUpdate (이부분을 통해서 true, false의 리턴을 가지고 그 이후에 실제로 랜더가 되지 않게 조절할 수 있음,
불필요한 랜더 방지를 위해 필요함)
-> Unmounting(사라진 후)
* componentWillReceiveProps
props를 새로 지정했을때 바로 호출된다.
state의 변경에 반응하지 않는다.
props의 값에 따라 state 를 변경하고자 하면, setState를 이용하여 변경해야한다.
-> 각각 다음 이벤트로 가는것이 아니고, 한번에 변경된다.
* shouldComponentUpdate
props, state 각각 변경되거나, 둘 다 변경되었을 때 모두 newProps 와 newState를 인자로해서 호출한다.
return type이 boolean이다.
true -> render
false -> render 호출되지 않음
이 함수를 구현하지 않으면 기본값은 항상 랜더되는 true 이다.
* componentWillUpdate
컴포넌트가 재 랜더링 되기 직전에 불린다. setState 를 사용하면 안된다.
* componentDidUpdate
컴포넌트가 재 랜더링을 마치면 불린다.
* component 언마운트
언마운트 되기 직전에는 컴포넌트가 사용하고 있던 메모리중에 정리할 것이 있으면 정리하거나,
api 응답하기 전에 언마운트 된다면 더이상 받을 준비를 하지 않겠다는 처리를 하는 부분이다.
      class App extends React.Component {
        state = {
          age: 29,
        };
        interval = null; // 새로 정의
        constructor(props) {
          super(props);
          console.log("constructor", props);
        }
        render() {
          console.log("render");
          return (
            <div>
              <h2>
                Hello {this.props.name} - {this.state.age}
              </h2>
            </div>
          );
        }
        componentWillMount() {
          console.log("componentWillMount");
        }
        componentDidMount() {
          console.log("componentDidMount");

          this.interval = setInterval(() => {
            this.setState((state) => ({ ...state, age: state.age + 1 }));
          }, 1000);
          //timer를 사용하거나 api를 사용함
        }

        componentWillReceiveProps(nextProps) {
          console.log("componentWillReceiveProps", nextProps);
        }
        shouldComponentUpdate(nextProps, nextState) {
          console.log("shouldComponentUpdate", nextProps, nextState);

          return true;
          //false로 하면 다음단계로 넘어가지않음
        }
        componentWillUpdate(nextProps, nextState) {
          console.log("componentWillUpdate", nextProps, nextState);
        }

        componentDidUpdate(prevProps, prevState) {
          console.log("componentDidUpdate", prevProps, prevState);
        }

        componentWillUnmount() {
          clearInterval(this.interval);
          // inteval=null 정의 되어있음.
          // 이 컴포넌트가 사라지면 타이머가 사라짐..
        }
      }
      ReactDOM.render(<App name="MYOMYO" />, document.querySelector("#root"));
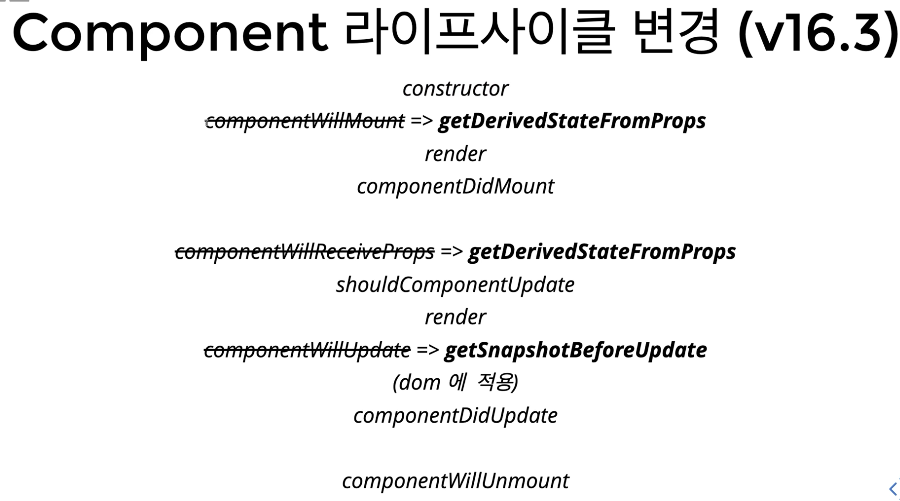
- v16.3 이후 라이프사이클 hooks
- 스크롤 형태로 예제 풀어보기
    let i = 0;
      class App extends React.Component {
        state = { list: [] };
        // 스크롤 크기 조정 함수 render
        render() {
          return (
            <div id="list" style={{ height: 100, overflow: "scroll" }}>
              {this.state.list.map((i) => {
                return <div>{i}</div>;
              })}
            </div>
          );
        }
        componentDidMount() {
          setInterval(() => {
            this.setState((state) => ({
              list: [...state.list, i++],
            }));
          }, 1000);
        }
        getSnapshotBeforeUpdate(prevProps, prevState) {
          if (prevState.list.length === this.state.list.length) return null;
          const list = document.querySelector("#list");
          return list.scrollHeight - list.scrollTop;
        }
        componentDidUpdate(prevProps, prevState, snapshot) {
          console.log(snapshot);
          if (snapshot === null) return;
          const list = document.querySelector("#list");
          list.scrollTop = list.scrollHeight - snapshot;
          // 숫자가 늘어나는 만큼 스크롤이 따라 내려갈 수 있도록 조정
        }
      }
- error boundaries
가장 최상에 있어야 밑에 에러를 잡을 수 있음
보통은 error boundaries 라이브러리를 설치해서 사용함
class App extends React.Component {
        state = {
          hasError: false,
        };
        render() {
          if (this.state.hasError) { //hasError 가 true 이면
            return <div>예상치 못한 에러가 발생했습니다. </div>;
          }
          return <WebService />;
        }
        componentDidCatch(error, info) { //에러가 발생하면 이 hooks 에서 알아낼 수 있음
          this.setState({ hasError: true });
        }
      }
      ReactDOM.render(<App name="MYOMYO" />, document.querySelector("#root"));